

This article applies to RealVNC Connect through version 7.
We are starting with remote printing.
You might need to print a file to a local printer when using remote access. This will happen especially when you’re working from two machines at the same time. Luckily, RealVNC Connect makes this very easy to do.
Also, more interesting tips on how to use VNC remote access software can be found here.
What do you need in order to print using remote access?
Imagine working on your company-issued computer, but occasionally needing to print documents from the home one. You have a printer right next to you, but it’s tedious to always have to make a local copy of the file before printing.
Provided you have a RealVNC Connect Professional or Enterprise subscription, this is extremely easy to do. Be mindful that this feature is device and subscription dependent.
Nothing needs setting up, as the feature is part of the software right out of the box. Here’s how to actually use it.
Printing a file from a remote computer
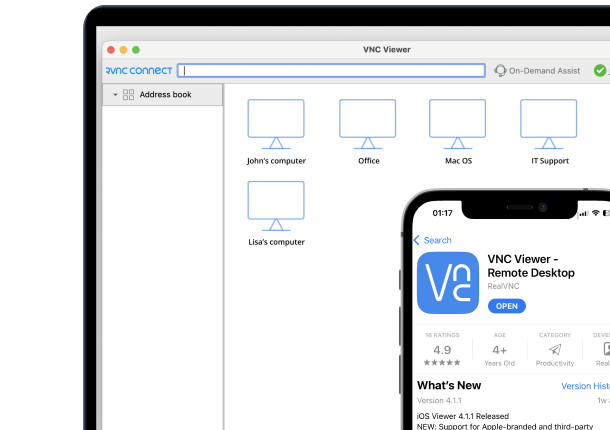
Open VNC Viewer v7 VNC Server v7 (or try our new unified app with RealVNC Connect v8), and select the machine you want to control. Of course, the machine will need to run our VNC Server. In this particular situation, we’re talking about your home computer. Find the file you would like to print and open it.
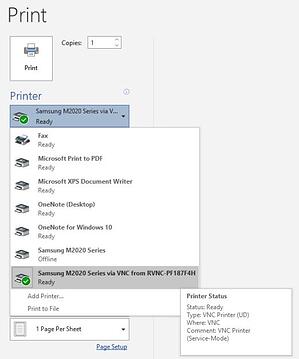
Next, go to File > Print or use the Ctrl + P keyboard combination. The printer connected to the machine running VNC Viewer is shown. It’s listed as Printer name via VNC from Machine name, as seen below. Print as you normally would and the document will come out.
In regards to print quality, RealVNC Connect will use the best possible print quality on the local printer. Altering print settings is also possible. You can do so by modifying the default printer settings on the machine running VNC Viewer.
If you haven’t tried RealVNC Connect yet, you can take a free 14-day trial.